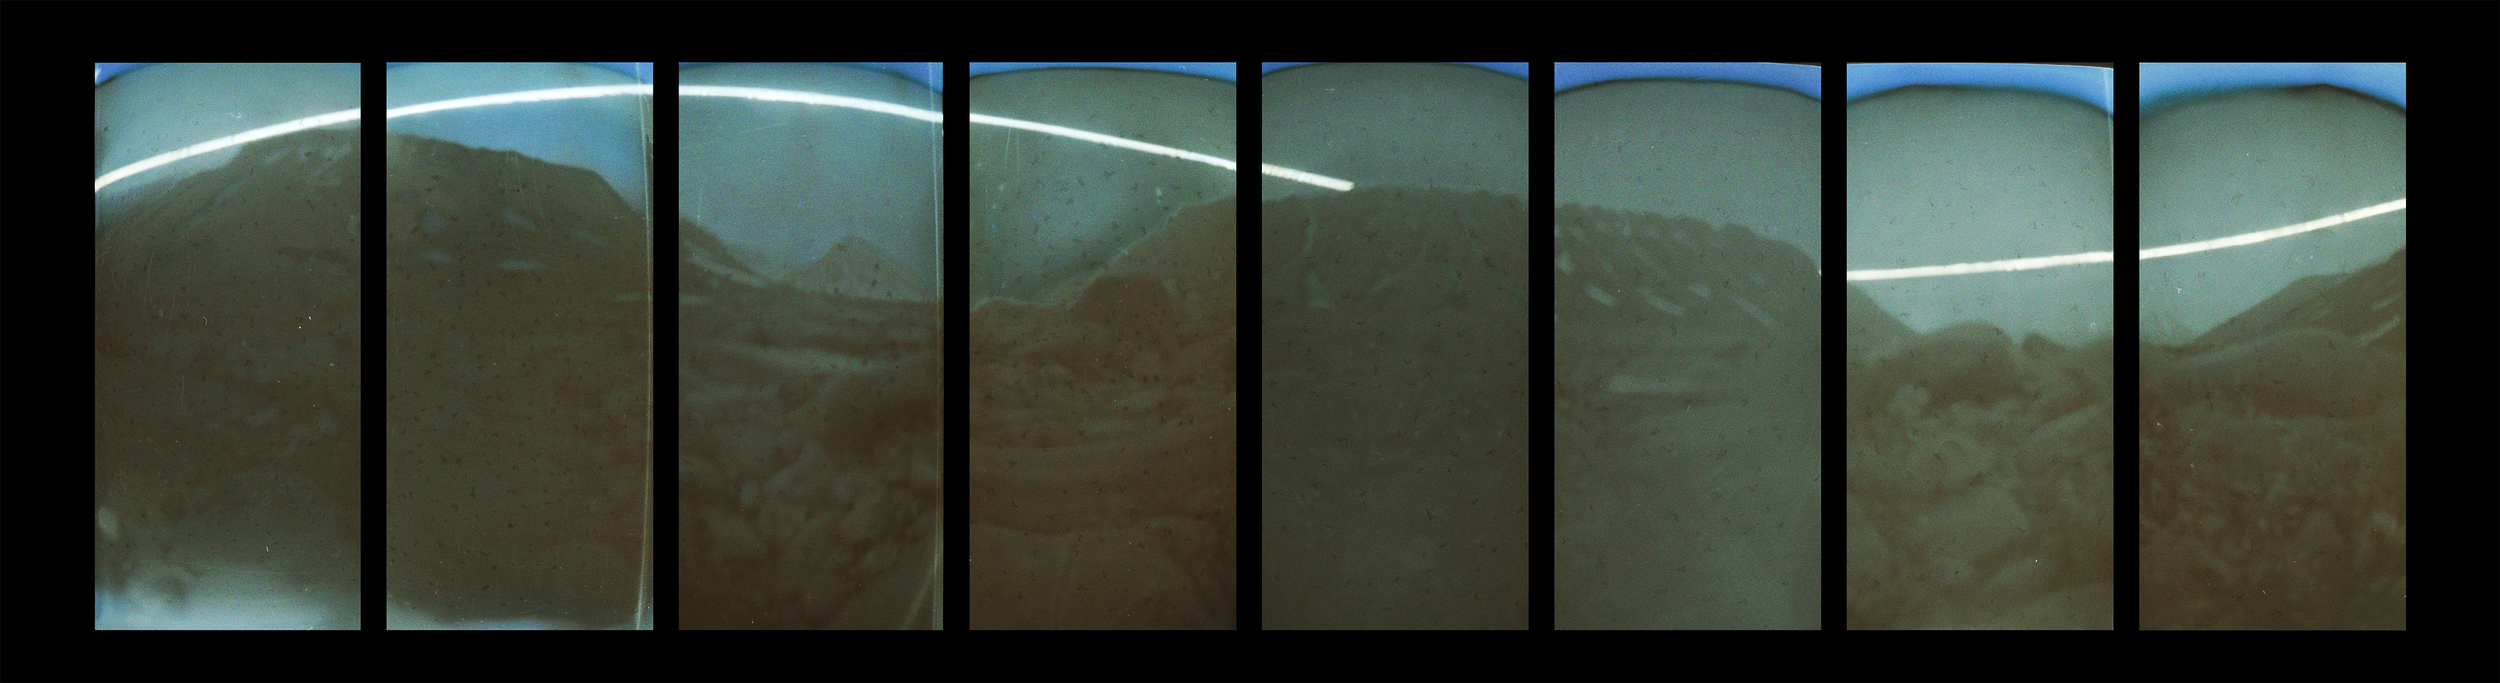
During my travels in Svalbard in 2023, I took a series of 360-degree panoramic pinhole images showing the full path of the midnight sun over the summer solstice. The midnight sun refers to the path of the sun above the Arctic Circle. In the summer months, the sun never sets, but instead circles overhead in a slightly lopsided path. As far as I know, this is the first time the midnight sun’s full path has been captured with purely analog means, at least for an artistic image. Doing this required designing and building a set of custom pinhole camera with multiple chambers — essentially eight cameras stuck together — that I could later stitch together into a single panoramic image. In the end, I opted against seamlessly stitching them together, preferring the aesthetic of the eight panels that give a bit of a view into the process.
The making of polar days
Solargraphy
These images are an example of solargraphy, a form of pinhole photography popular amongst hobbyists for being a very simple, foolproof method of capturing cool-looking images. Solargraphy involves any kind of makeshift pinhole camera, usually a film canister or soda can with a hole poked into one side, and black & white photo paper stuck to the projection surface on the inside. This is then sealed up and left in a secure spot, ideally with a nice view of the sun, for weeks to months, left to expose the entire time. Because of the long exposure time, the image becomes etched into the photo paper, with no need to process it. Just scan it, invert it, bump up the contrast, and you’re done! The result is an eerie but visually stunning image with a ghost-like landscape, and bright lines showing the evolving path of the sun over that time period. I used this process to make the cover art for my recent album A Really Good Spot after optimizing the process a bit and using a large square tin as a pinhole camera, aimed out the window at my family cottage in rural Quebec. I felt this would be a great process for capturing the mysterious landscape of the High Arctic as well, and that it would be a fun challenge to further push this project into a panoramic format.
This proved to be quite difficult, and it seemed very few people had attempted anything similar. With no lenses used in pinhole photography, I couldn’t just make an ultra-wide field of view. I also toyed with the idea of having photo paper wrap the entire inside of a tube and poking holes through both the cylinder and the photo paper, in a sort of zoetrope fashion. Another idea was to have an inner cylinder with photo paper wrapped around it, and an outer cylinder with the pinholes, all projecting onto the same surface.
Camera production
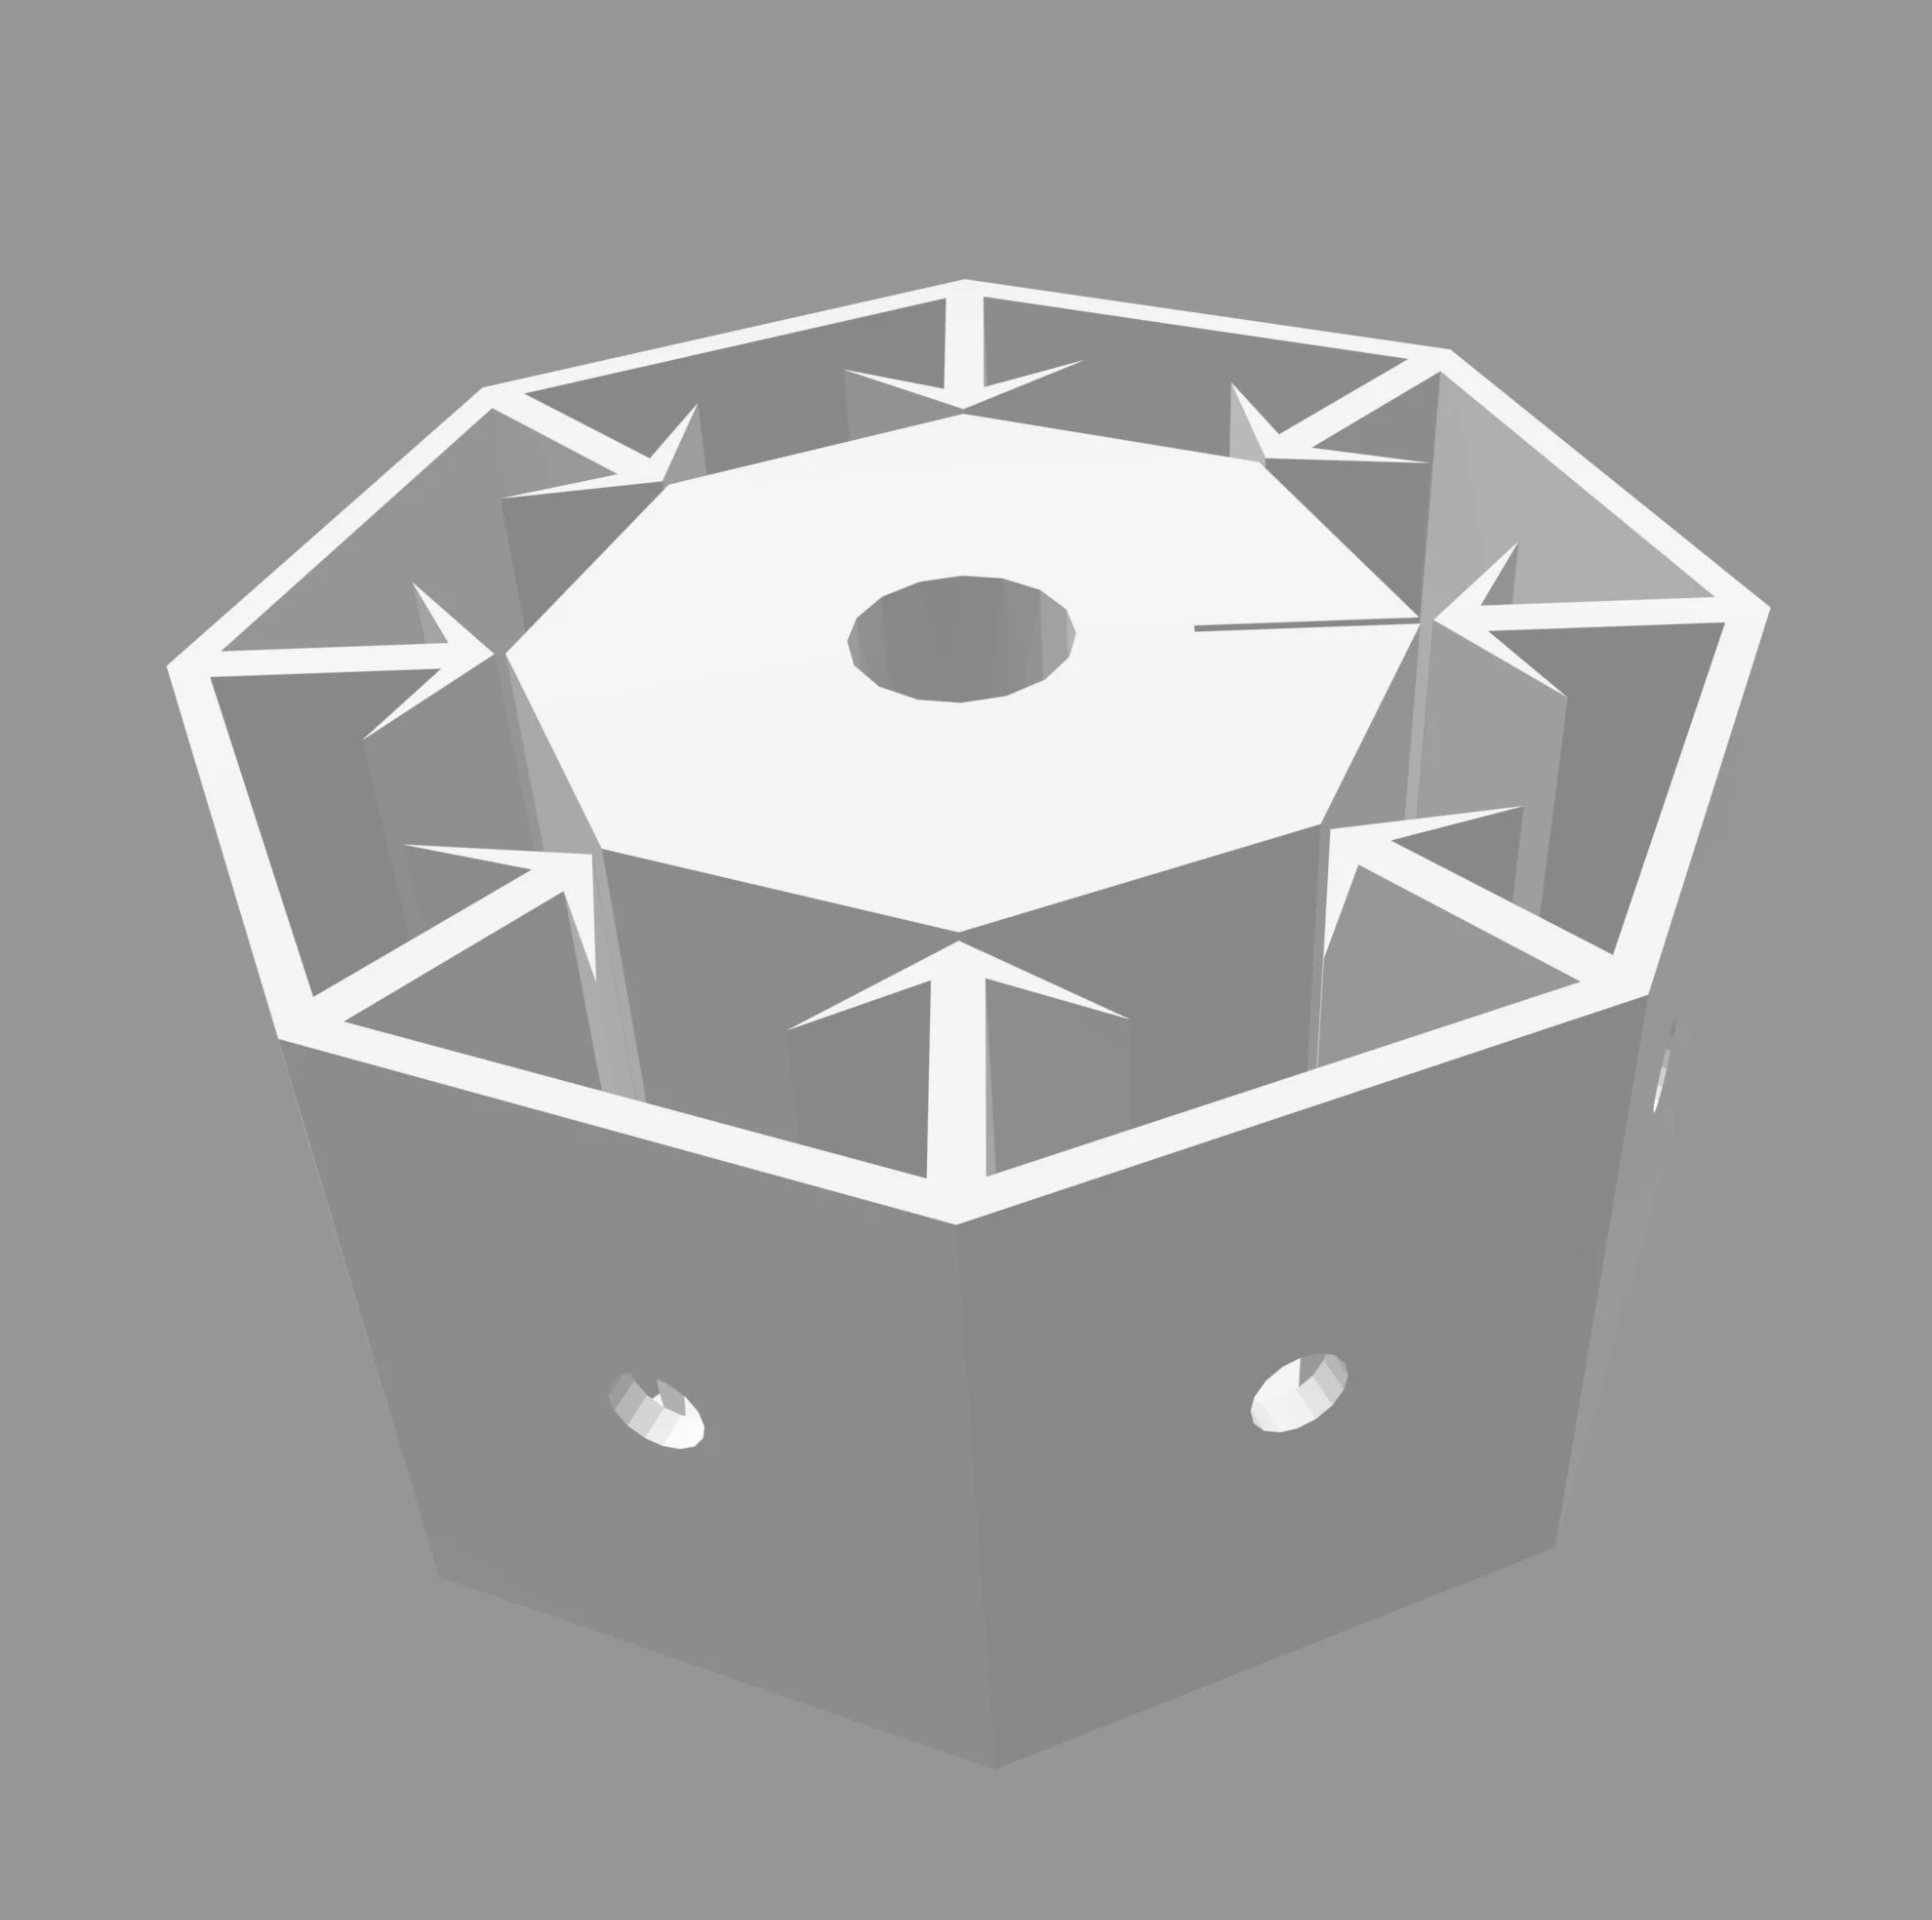
Unfortunately, because the projected image is inverted (both vertically and horizontally), I realized that the projections wouldn’t line up at all, and instead opted for a system of eight isolated chambers that would give me images that I could later invert digitally before aligning them together. I designed this multi-chamber camera in Rhino. There is an inner hexagon around which the photo paper can be wrapped and tucked into a little groove. Everything was very tight to eliminate the need for any adhesive that may damage the photo paper. Each chamber has walls that almost reach the inner hexagon. The little arrow shapes were meant to redirect any light reflections away from the photo paper, ensuring as high a contrast as possible. The lid was just a laser-cut hexagon with a layer of acrylic that served as a gasket to prevent any light leaks. The holes in the walls of the design were deliberately over-sized. This was to provide room for the actual pinholes, which I made by taking a small square of aluminum foil and poking a tiny hole through it with a needle. I 3D-printed many copies of the camera, spray-painted them matte black, and packed them up to go to Svalbard. The images below show the rendering, 3D printing process, and the finished camera with photo paper wrapped around the inner hexagon.

Placing the cameras
Before heading to Svalbard, I wanted to make sure there would actually be areas with a full panoramic view, unobscured by mountains or buildings. As I mentioned earlier, the sun’s circular path is a bit lopsided, with its altitude reaching its peak around in midday, and its lowest point at night. Not being familiar with Longyearbyen, I scoped out various locations on Google Street View, as well as a very useful website called SunCalc, that calculates the sun’s altitude at any point in the world, at any given time. I then tried to find spots whose views at any azimuth were unimpeded at the predicted sun altitudes. In reality, I was limited by my ability to securely fasten my cameras, and was able to place one camera with a view unencumbered by mountains or buildings, but the obstacles added an interesting layer of depth. I also needed to make sure the sun would never be cropped out of the photo paper onto which it was being projected, so knowing the sun’s angle was crucial for that.
Once in Svalbard, I got to work on my first day placing the cameras around Longyearbyen. I had to act fast, because we would leave the next day to sail for two weeks. I brought various hardware with me to secure the cameras, as well as a couple tripods. The remnants of mining equipment ended up being great posts to hold up cameras. Shown on the right is the one camera with a totally unobstructed view of the sun’s path. The camera that ultimately gave the most interesting view was placed on the ground, with a couple rocks on top to make sure it didn’t go anywhere. I was very worried about adding more plastic to Svalbard’s pristine landscape. For most of the cameras, I stacked two of them at staggered angles to try to create a more seamless image, but the images were different enough that I ended up just picking my favorite of the two options and discarding the inferior one.
Processing the images
One of the fascinating things about solargraphy is that, although we use black and white photo paper, we end up with colors — just not the ones you would expect. Shown here is the raw scan for one of the images. The image is then inverted, and each frame is cut out an flipped so that they form a continuous landscape. I’m not entirely sure what the brown bit is at the top of the image (actually the bottom of the camera). My guess would be condensation, but I didn’t get a good chance to diagnose it, and kind of enjoyed the effect it had on the image.

The results
After processing the “negatives”, I ended up with a beautiful series of images showing the path of the midnight sun, with one of them showing the complete path uninterrupted by mountains. I’m really happy with how they turned out, especially since this was a complete experiment, and I wouldn’t know whether it really worked until the images were scanned over a month later. The first image, with the camera placed on the ground, was exhibited at Princeton’s recent Art of Science exhibit, and can still be seen in the Friend Center atrium. I would love to take more of these and play around with longer exposure times, since Svalbard’s sunset time changes so rapidly between the polar day and polar night. It seems here that we only had a few days of full sunlight over the two week exposure, and because it was over the solstice, there was a bit of overlap in the sun’s daily paths. I think an ideal period of exposure would be from the summer solstice to the first 24-hour night.